Physical educators and adapted physical educators have stepped up these past few months to make sure their students had opportunities to continue, as best they could, with the physical education curriculum during the COVID-19 pandemic. For a majority of teachers, lessons were designed with the premise that students would not have much, if any, of the traditional equipment often used in physical education or adapted physical education settings.
The purpose of this article is three-fold:
- To encourage and support physical educators and adapted physical educators to use our recipes to make some homemade equipment with the intent to get this equipment in the hands of their students for their fall classes. We do realize that to complete some of our equipment recipes; there will be costs involved. Perhaps some of the physical education or adapted physical education equipment budget for 2020-2021 could be used to purchase the materials to make the equipment; or possibly, funds for materials could be obtained through Donor’s Choose or other similar programs that fund school projects.
- To encourage teachers to pass these recipes along to families or other community members who want to support the physical education and adapted physical education programs, by either making the equipment or donating the materials so the teachers could make the equipment in preparation for classes.
- To provide several activities that the physical educators and adapted physical educators could have the students do with their distance learning equipment. We would also encourage the teachers to keep abreast of the numerous resources that have been posted on social media (Twitter, Facebook, Instagram, etc.) that might also provide equipment ideas that would be simple, easy, and cost-effective to make this summer so that their students might be able to work toward mastery of additional physical education content in their fall classes.
In sum, the goal is to provide equipment recipes and corresponding activities to support physical educators and adapted physical educators to design distance learning activities for their students that will still meet the physical education national/state grade-level outcomes. Thus, providing our students with meaningful, yet fun opportunities to master grade-level outcomes – even in the chaos of a pandemic.
Equipment Recipes
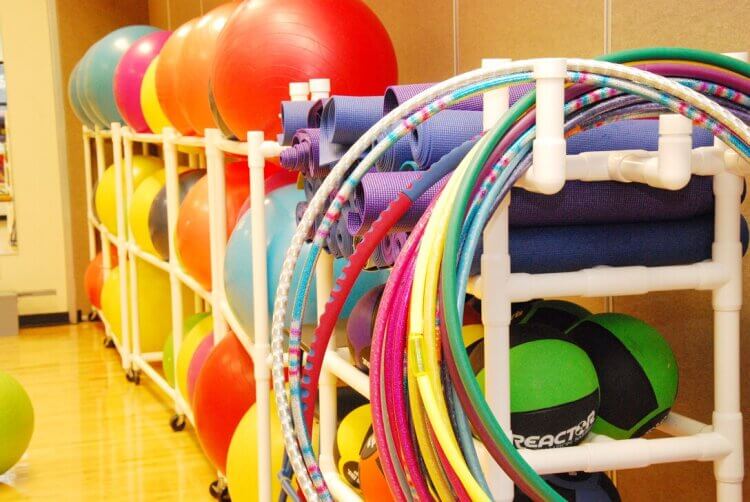
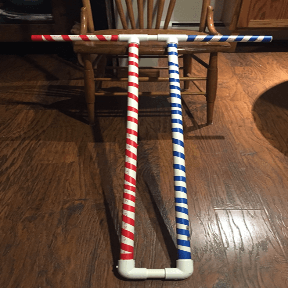
Hula Hoops:

Supplies:
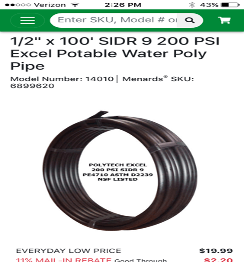
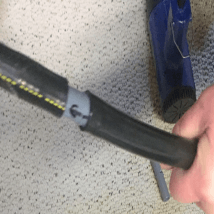
- ½ inch or ¾ inch diameter water poly pipe, comes in different lengths, 50’, 100’ and 200’
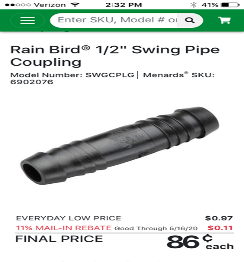
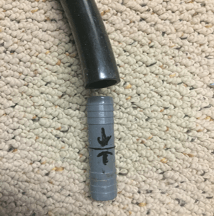
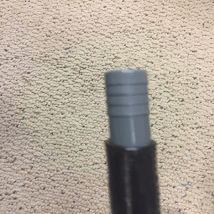
- ½ inch or ¾ inch swing pipe couplings, 1 for each hoop
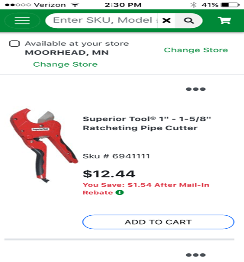
- Ratcheting pipe cutter
- Heat gun
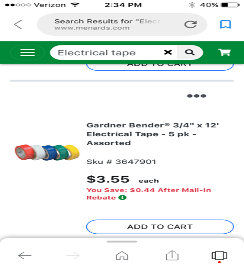
- Colored electrical tape
Directions:
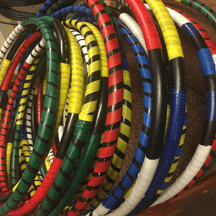
- Using the pipe cutter, cut the poly pipe the size you want your hoop to be:
- For a hula hoop (www.wikihow.com):
- You measure from the floor in front of your toes up to about your belly button that will give you a great approximate diameter size; 32”-40” for adults and 28”-32” for children
- Use ¾ inch diameter poly pipe
- For target hoops:
- Use ½ inch poly pipe and make them a 2-foot diameter
- For a hula hoop (www.wikihow.com):
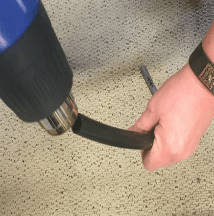
- Hold one end of your hoop and heat it with the heat gun for about 20-30 seconds. Be careful because the pipe does get hot! Heat the plastic all around the end and an inch from opening to make sure it is getting soft.
- Set the heat gun down on a hard heat-safe surface. Pick up a coupling and push the coupling halfway into the end of the hoop. Heat the other end of the pipe, and push it until it meets the other end of the hoop.
- Pick out the color electrical tape to decorate your hoop, and then wrap the tape around the hoop! You now have a colorful, fun hula hoop!!
A Variety Activities to Do with Your Hula Hoop:
- Hula Hoop to music
- Roll your hoop on the floor as far as you can
- Walk the dog (flick the hoop forward; snap your wrist at the end so the hoop comes back to you)
- Bean bag toss with a partner (2 hoops, 2 sets of 4 of the same colored bean bags)
- Tic Tac Toe with a partner (9 target hoops, 2 sets of 8 different colored bean bags)
- Hopscotch (10 target hoops, set up hoops in a 1, 2, 1, 2, 1, 2, 1 pattern)
- Partner hoop swing (2 students, 1 target hoop; siblings/parents hold hands or a noodle with the hoop on it; start music & swing the hoop in a circle until the music stops; switch arms and repeat)
Boomerangs:
Supplies:
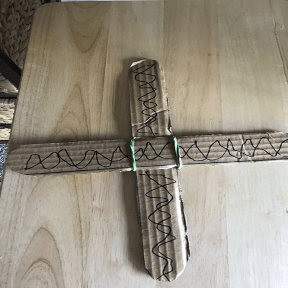
- Sturdy Cardboard
- 1 roll of double-sided carpet tape
- Ruler
- Scissors
- Rubber bands
- Markers to decorate
Directions:
- Draw a pattern for the 2 boomerang blades onto the cardboard (14 inches long by 1½ inches wide)
- Cut the 2 boomerang blades out with scissors
- Take the 1st blade and stick a small piece of double-sided carpet tape in the center of the 1st blade
- Remove the paper backing on the tape and stick the 2 blades together centering the 2nd blade (the boomerang should look like a plus sign)
- Reinforce the boomerang by taking the rubber band and wrapping it around the blades
- Decorate your boomerang with your markers
A Variety of Activities to Do with Your Boomerang:
- Toss the boomerang with an inward motion starting by holding it up high on your throwing arm side and bringing your arm down across your body releasing it as you are moving it down to your opposite side.
- Throw the boomerang and try to catch it before it hits the ground.
- Toss/Catch the boomerang with a partner.
- Try bending the ends of the boomerang blades to see if it will fly a different direction.
- Toss the boomerang to a target.
Lap Ramp (to assist students in wheelchairs participate in more activities)
Supplies:
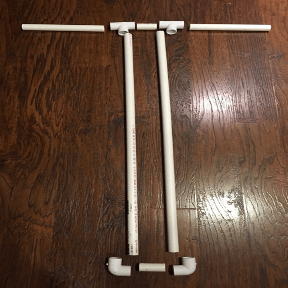
- 1– 3/4 inch x 10 foot solid core PVC pipe
- 2– 3/4 inch 90 degree PVC elbow
- 2– 3/4 inch x 1 inch x ½ inch PVC tee
- Colored electrical tape
- PVC cutter- hand saw or ratcheting pipe cutter
Directions:
- Cut 10 foot PVC pipe into:
- 2-37 inch length pieces
- 2-10 inch length pieces
- 2-2 ½ inch length pieces
- Take the PVC pipe pieces, tee pieces, and elbow pieces and join all together
- Decorate with electrical tape
A Variety of Activities to Do with Your Lap Ramp:
- Use the ramp for bowling
- Use the ramp for bocce
- Use the ramp to push a soccer ball into a goal area
- Set the end of the ramp on a table and the other on the student’s lap and work on pushing a ball up the ramp and have the ball roll back to the student’s lap
- Set the end of the ramp on another person’s lap and push a ball back and forth
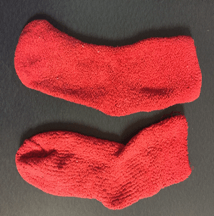
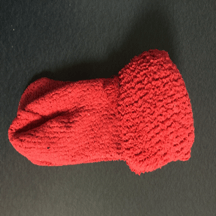
Sock balls:
Supplies:
- Many pairs of socks
Directions:
- Put a pair of socks together
- Fold the socks into each other to make the ball

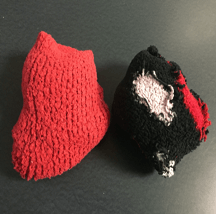
A Variety of Activities to Do with Your Sock Balls:
- Sock bowling: find 10 objects, anything unbreakable, that can tip over (plastic water bottles, Kleenex boxes, paper cups, etc.). Set up the items 10 feet away from the starting point. Underhand roll the sock balls to knock down the objects. Roll until all the objects are knocked down.
- Sock shot: set a bucket, wastebasket, laundry basket, box, etc. by a wall. Step 6 feet away and take the sock balls and shoot them to see how many baskets you can make in one minute.